Embed a widget on any website
Create a widget, copy its embed code and paste it into your website to show your testimonials.
A widget shows your testimonials on your own website: a carousel, a grid, a badge and more. You design it in ReTestimonial, then paste a short piece of code into your site once.
Create a widget
In your project, open Widgets under Share in the sidebar and click Create Widget. Choose a widget type, pick a style (or start from scratch), give the widget a name and click Create Widget. The widget builder opens.
Add testimonials and design it
Choose the testimonials to show and adjust the design in the builder. If you pick testimonials by hand (Curate), add at least one before you publish.
Get the embed code
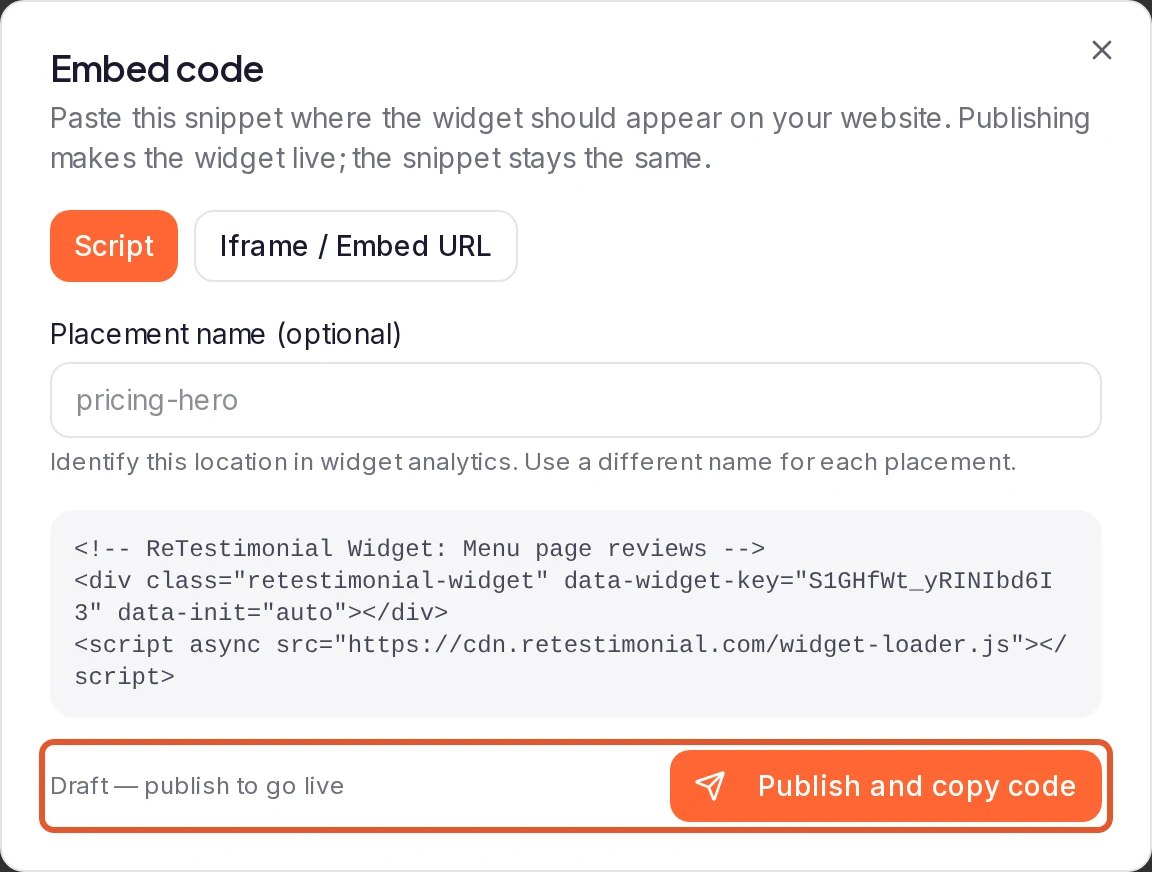
Click Get code in the builder's top bar. If the widget isn't live yet, click Publish and copy code. If it's already published, click Copy code.
If the dialog says Your widget is empty until you add testimonials., it has no button to publish or copy yet. Add a testimonial to the widget first.
Paste it into your website
Paste the code into your page's HTML where you want the widget to appear. The code is a <div> that marks the spot and a <script> that loads the widget.
On a site builder, follow its guide for where the code goes: WordPress, Webflow, Framer, Squarespace, Wix, Shopify or Notion.
Check it on your site
Open the page on your live site. The widget appears where you pasted the code. A floating style appears on top of the page instead, wherever the code sits, and a widget far down the page loads when you scroll near it.
If nothing appears, see Widget not showing on your website. If it's there but doesn't look as it does in the builder, see Widget looks different on your website.
Good to know
- The code doesn't change when you edit the widget. Once it's published, your edits reach your site on their own, with no new code and no second publish. The exception is switching to a floating style (one that sits on top of the page): Get code then gives you new code to replace the old. See Publish, update or unpublish a widget.
- Name each placement (optional). Before you copy the code, you can fill in Placement name, for example
pricing-hero. It tells your widget analytics which spot on your site a view came from. Use a different name for each place you embed the same widget.
Find the code again
You don't need to keep a copy of the code. Once the widget is published, copy it again from any of these places:
- The Widgets page: click Copy embed on the widget, or open its menu and choose Copy embed code.
- The widget builder's top bar: click Get code, then Copy code.
- The builder's Settings tab: click Get code at the top of the tab. It opens the same window as the top bar's button.
All three give the same code. A Placement name is added in the Get code window, which doesn't remember the last one, so type it again there if the code on your site has one.
Script or iframe
The code in the steps above is the Script code, the default. If Get code also offers Iframe / Embed URL, that second kind shows the widget in a frame of its own: an <iframe> tag to paste, or only its Embed URL for a platform that asks for a link. Keep Script unless your platform can't run scripts, as in Notion. In a frame:
- The height is fixed at the Height (px) you set. To make the frame follow the widget's height, tick Automatic sizing and Proof Impact and paste the helper script it adds to the code.
- Without that helper, the widget can't see your page. Proof Match rules don't apply, views can't be linked to conversions and there's no Placement name. See If a rule doesn't match and Auto-Optimize a Proof Match widget.
- Custom JavaScript and the Star rating snippet don't work, and pop-ups the widget opens stay inside the frame.
- Some styles need Script, including every floating one. The dialog then says This style requires the script embed.
If the frame shows an error or cuts the widget off, see If you used the iframe code.
Options you can add to the embed code
The <div> in the code takes a few optional attributes. Add them inside its opening tag and leave the rest as you copied it:
<div class="retestimonial-widget" data-widget-key="your-widget-key" data-init="auto" data-language="de"></div>With the iframe code and its helper script, they go on the <iframe> tag instead. A plain iframe reads none of them.
Name a placement
data-retestimonial-placement="pricing-hero" is what Placement name adds for you. To name a spot that already has the code, add it by hand: letters, numbers, spaces, hyphens or underscores, up to 64 characters. A name with any other character is ignored.
Show one language on a page
data-language="de", with your language's code, shows that page's widget in one language. It works only while the widget shows translations, with Visitor's language or One fixed language chosen under Translations & texts, and translations are on Business. See Translate testimonials.
Tell the widget which page it's on
When a site builder runs the code in a frame of its own, as Wix's Embed HTML element does, the widget can't read your page's address. Add data-page-path="/pricing", with that page's own path, so Proof Match rules and widget analytics know the page. See Embed a widget on Wix.
Tag a page for Proof Match
Page tags are for Proof Match rules. See Tag a page.
In a React, Next.js or other single-page app
Load the <script> once, in the HTML every page shares, and put the <div> wherever the widget belongs. The widget fills a <div> that's added to the page later, so it also shows after a visitor moves to another page without a reload, or opens a tab or an accordion that holds it.
Next steps
Was this page helpful?
Widget questions
Short answers about widgets, from plan limits, page speed, search engines and phones to branding, dark mode, languages and missing testimonials.
Embed a widget on WordPress
Add your widget to a WordPress page, post, widget area or template with a Custom HTML block, then preview and publish it.