Customize your invite emails
Edit the subject, text, button and timing of your Smart Invites emails and reminders, and set where your customers' replies go.
Every Smart Invite follows a template: a first email asking for a testimonial, then reminders to customers who haven't answered yet. Smart Invites are on Premium and Business, and you need to own the workspace or be an Admin on the project to change templates.
Open a template
Click Invites under Collect in your project's sidebar, then the Templates tab. Each card shows a template's first subject line and its sequence, such as "3 emails · reminders after 3 days and 7 days".
Every project starts with Default — Friendly Request, marked Default: a first email sent straight away, then reminders 3 and 7 days after it. Click a template to edit it, or click New Template to start another. To add, copy or delete templates, or to change which one is the default, see Manage invite templates.
Write the first email
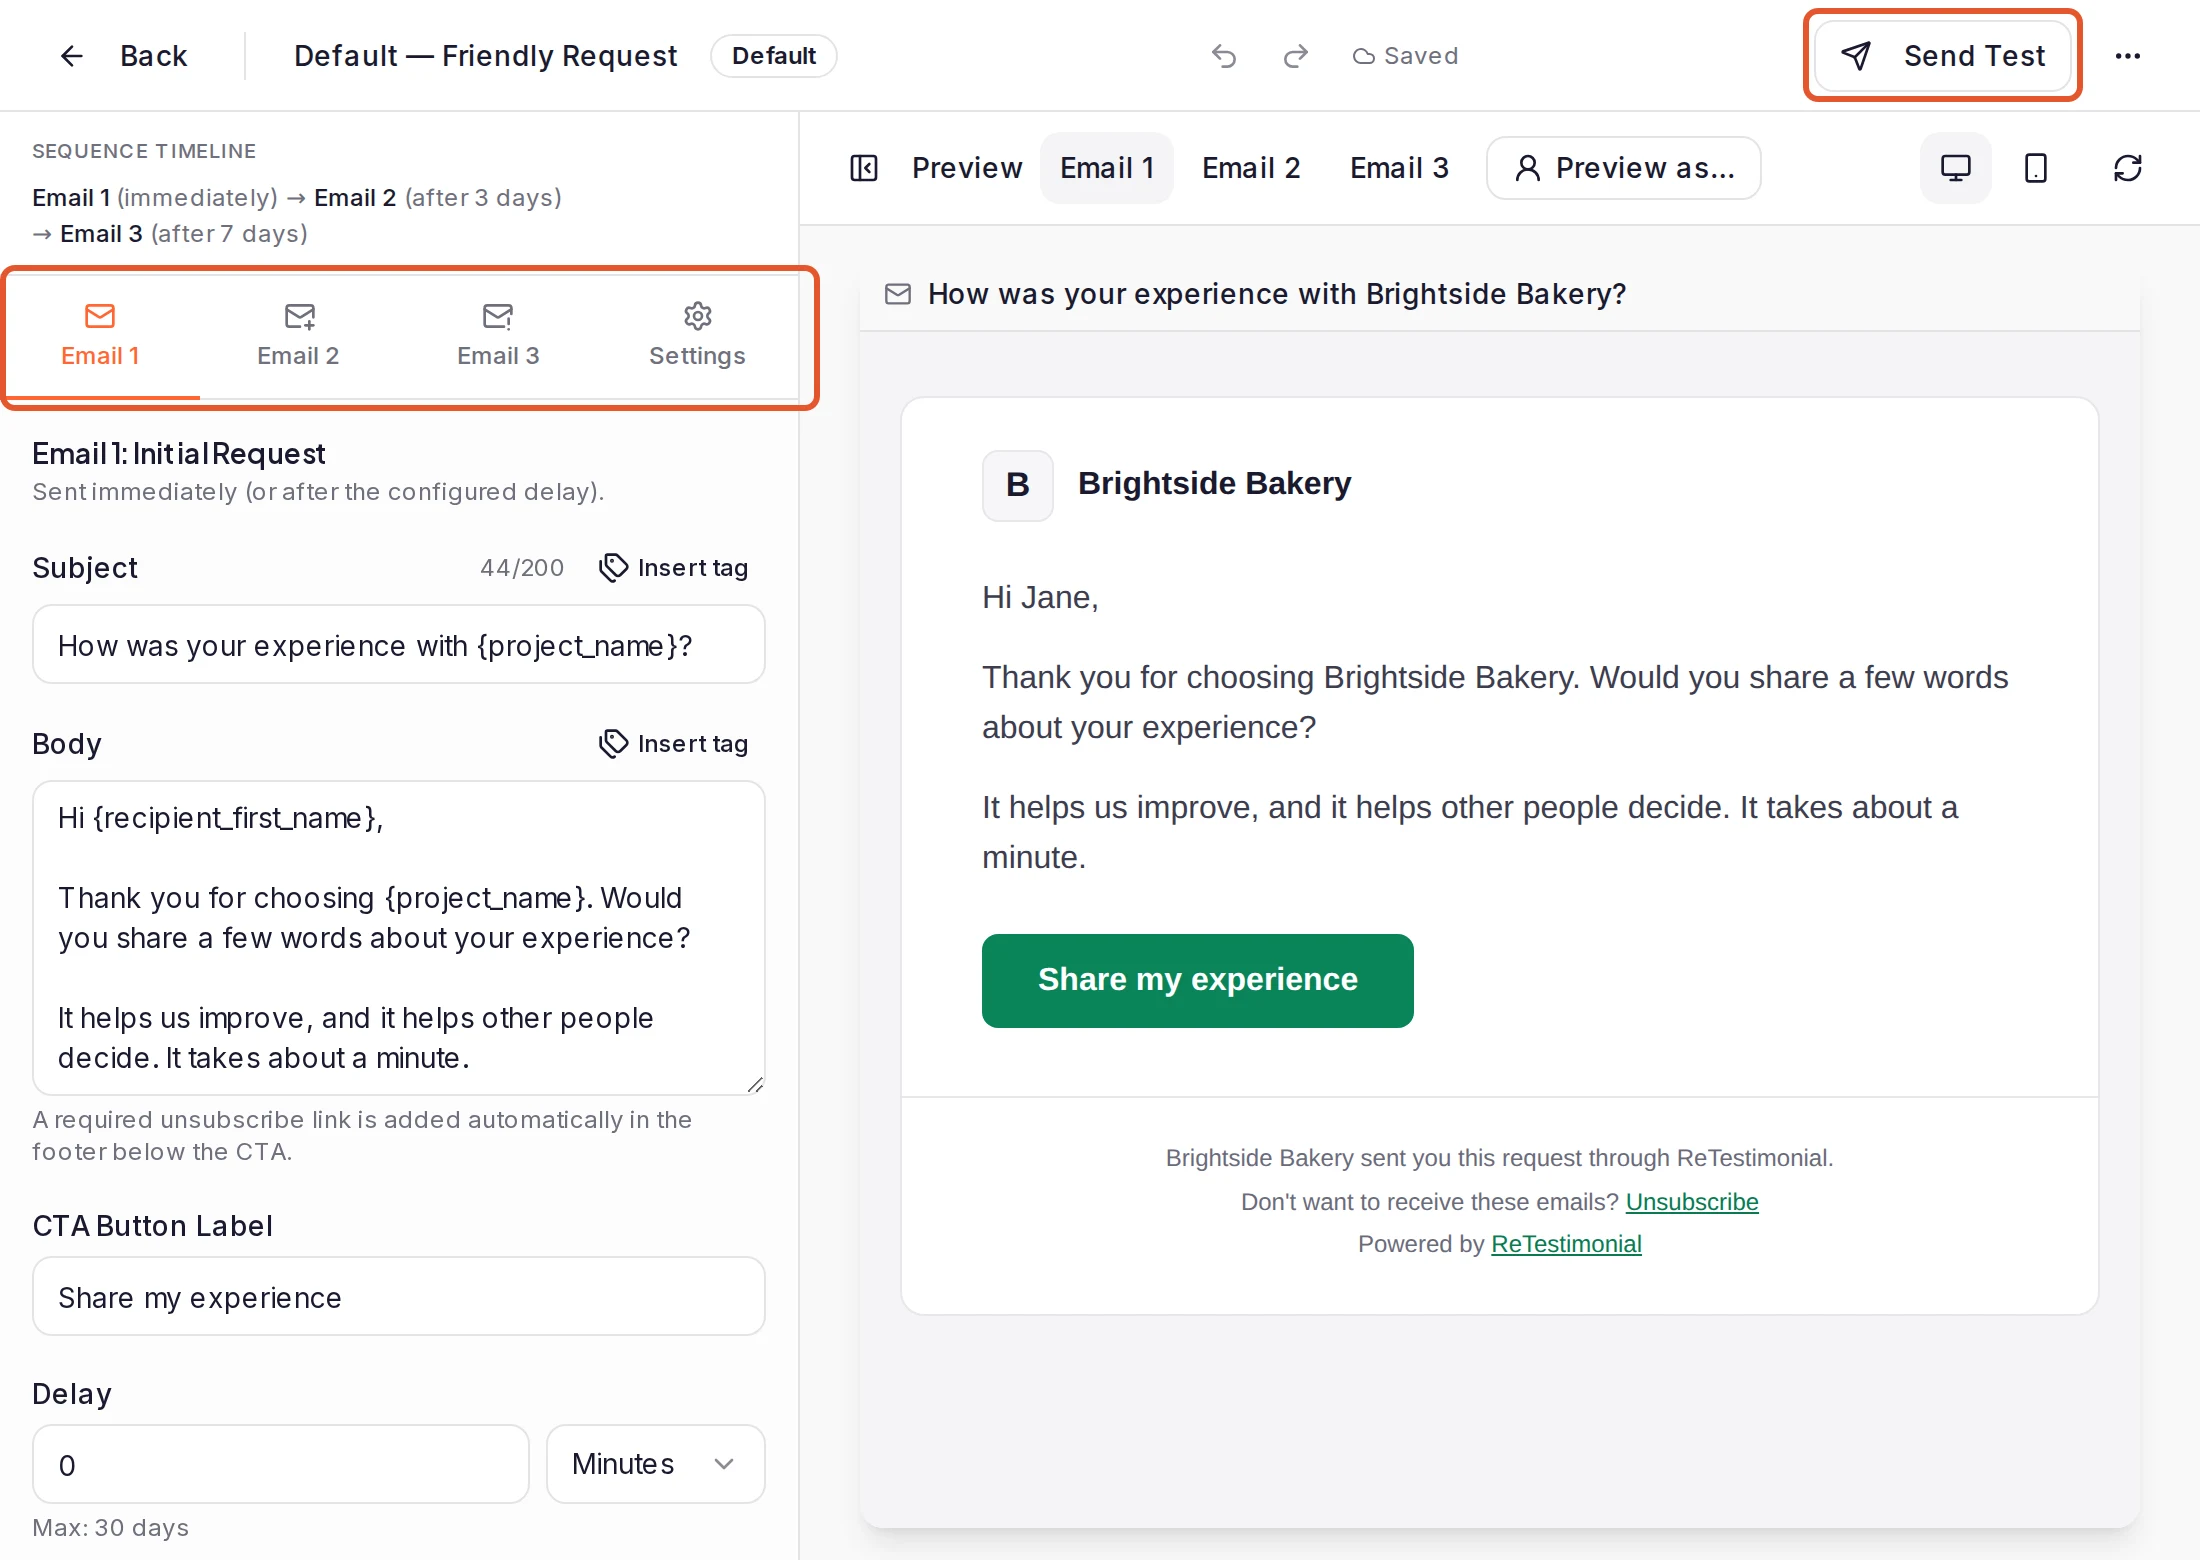
The template builder opens on the Email 1 tab. Fill in:
- Subject. The email itself opens with your text, so the subject isn't repeated inside it. A counter warns when it may be cut off on phones.
- Body, in plain text. Line breaks are kept.
- CTA Button Label, the text on the button that opens your form.
All three are required: until they're filled in, the top bar says what's missing and nothing is saved. The subject holds up to 200 characters, the body 20,000 and the button label 80. To rename the template, click its name in the top bar. Everything else saves as you type.
You don't need to add an unsubscribe link. Every invite gets one in its footer ("Don't want to receive these emails? Unsubscribe"), under a line that says your project sent the request, and mail apps that support it can show their own unsubscribe button. A customer who unsubscribes goes on the project's do-not-email list and gets no more invites.
Personalize it with tags
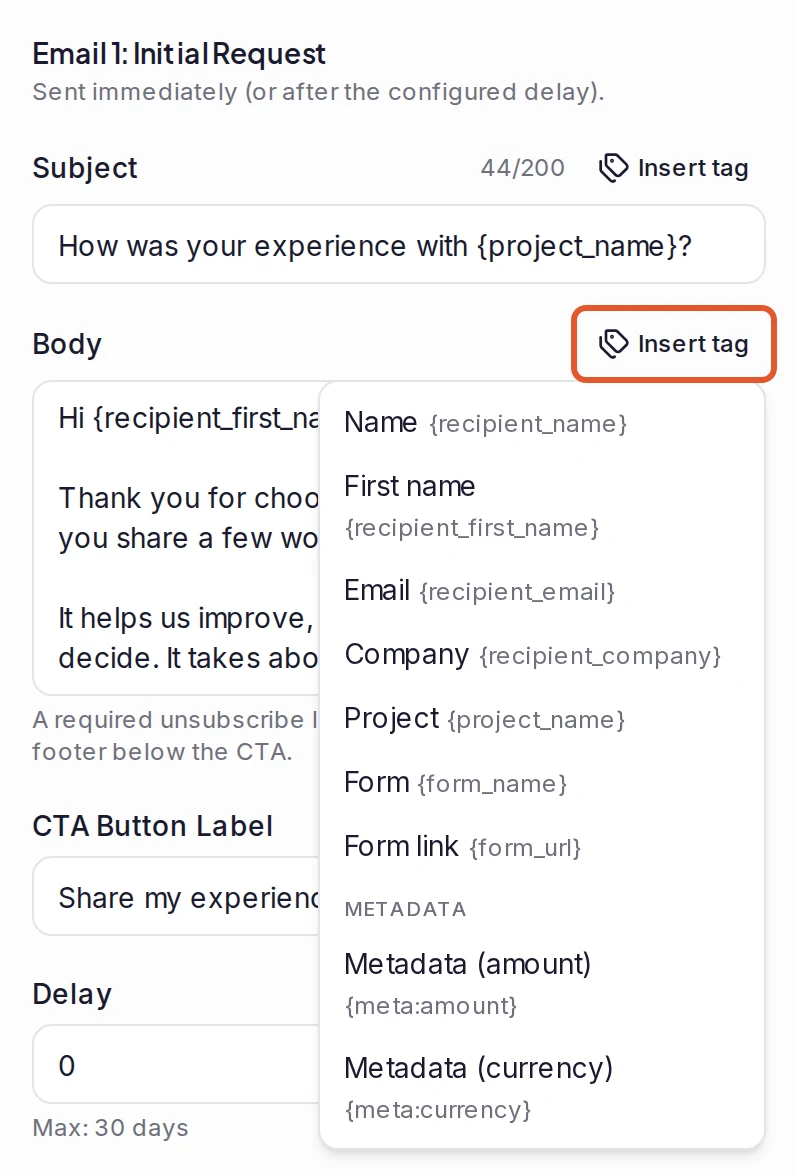
Click Insert tag above the subject or the body to add a tag where your cursor is. When the email goes out, each tag becomes that customer's details: {recipient_first_name} becomes their first name, or "there" when you have no name for them.
For every tag, what it becomes and what the email shows when a value is missing, see Invite email merge tags.
Set up the reminders
Email 2 (the first reminder) and Email 3 (the final reminder) go only to customers who haven't submitted yet.
- Turn a reminder off with the switch at the top of its tab. The tab then shows "(off)", and what you wrote is kept for later. Email 3 is only ever sent after Email 2, so turning Email 2 off turns Email 3 off too, and Email 3's switch stays off until Email 2 is on again.
- Leave its subject and body empty to reuse Email 1's. An empty CTA Button Label gets a standard label.
- Set its timing in Delay from Email 1, in Minutes, Hours or Days, up to 30 days. Both reminders count from Email 1, so give Email 3 a longer delay than Email 2. The builder warns you if it isn't. A delay of 0 is kept as 0, so that reminder goes out right after Email 1 is sent.
Email 1 has a Delay too, also up to 30 days: how long to wait before the first email when you invite customers by hand or from a file. A webhook uses its own Wait before the first email setting instead. The Sequence timeline at the top of the panel sums up when each email goes out.
Check the sender settings
On the Settings tab:
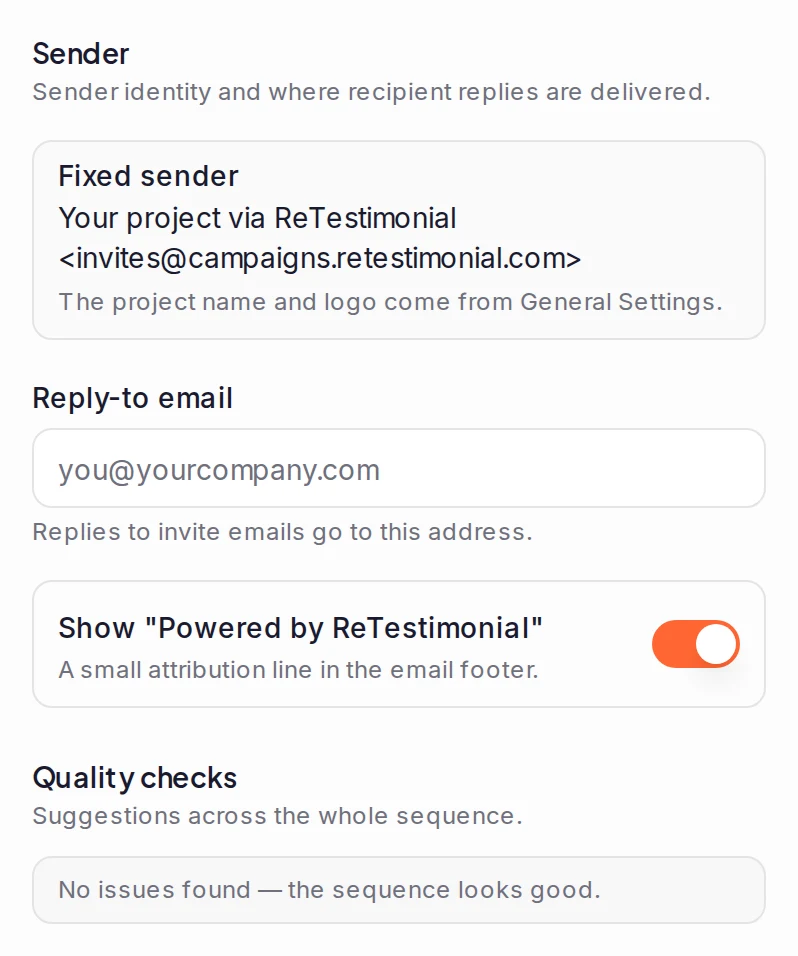
- Sender can't be changed. Invites come from your project's name followed by "via ReTestimonial", at
invites@campaigns.retestimonial.com. Your project's name, and its logo if it has one, head every email; they come from the General tab of your project's settings. - Reply-to email is where customers' replies go. Left empty, replies go to the workspace owner's email address.
- Show "Powered by ReTestimonial" adds a small line to the footer. On Business, turn it off to remove the line. On other plans the switch stays on and the line stays in your invites. The line above it, which says your project sent the request, follows the same switch: it ends "through ReTestimonial" while the switch is on, and names only your project when it's off. That line can't be edited.
- Quality checks lists suggestions for the whole sequence. Some come with a button that makes the fix for you.
Preview and send yourself a test
The preview on the right shows each email with sample customer details as you type, and Send Test in the top bar sends the email to your own inbox without using an invite.
For what the preview and a test show in place of a real customer's details, see Preview and send a test invite email.
Choose the template when you send invites
Pick the template in the Email sequence menu when you invite customers by hand, import a file or set up a webhook, and later in a webhook's settings. Project default template uses the template marked Default. A webhook keeps the template it had when you saved it, even if you change the default later. If you use routing rules on a webhook, on Business, each rule can use its own template.
To make another template the default, see Set a template as the default.
What happens next
While campaigns use a template, its top bar shows "Live — used by" and how many campaigns. Your changes reach them:
- Reminders are written from the template when they're due, so edits reach every reminder that hasn't gone out yet. Turning a reminder off stops it for everyone still waiting for it.
- Timing is set when a customer is invited, so a new delay applies to customers you invite after the change.
- To try changes without touching live campaigns, work on a copy: see Duplicate a template.
Related articles:
Was this page helpful?
Pause, change or delete a Smart Invites webhook
Pause a Smart Invites webhook to stop new invites, change its form, emails, paths or signing secret, or delete it for good.
Invite email merge tags
Every tag you can put in a Smart Invites email, what it becomes for each customer, and what the email shows when a value is missing.