Add a testimonial by hand
Type in a testimonial a customer sent you, with a rating, a photo and images, and find it in Pending once it's saved.
When a customer sends you kind words by email, in a chat or in person, you can type them into your project yourself. The workspace owner and the project's Admins and Members can add testimonials. Viewers can't.
Open the dialog
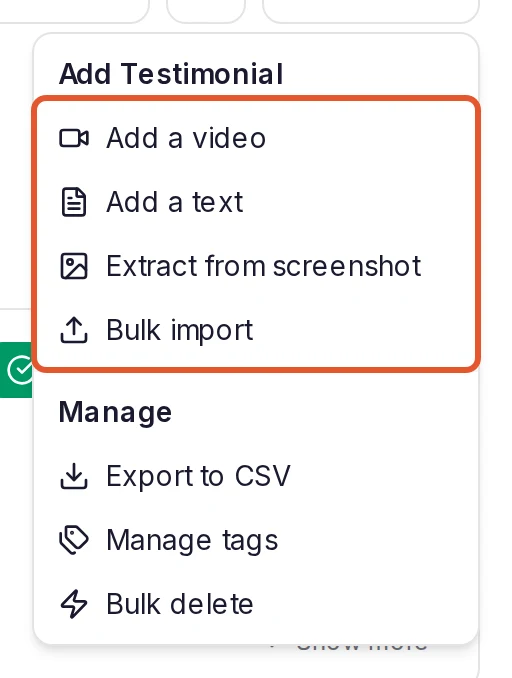
In your project's sidebar, open Pending or Approved. Click Options above the list and, under Add Testimonial, choose Add a text. The Add a text testimonial dialog opens.
Set the rating
The dialog starts with five stars. Click a star to change the rating. If the customer didn't give one, turn off the switch beside the stars, and the testimonial is saved without a rating.
Set the stars before you save: a testimonial's Edit window has no rating.
Enter the testimonial
Under Testimonial content, type or paste the customer's words: at least 10 characters. The toolbar above the box highlights, bolds, italicizes, underlines or links the text you select.
Under Attach an Image, click Choose images to add up to three images (JPEG, PNG, WebP or GIF). You can also paste an image from your clipboard, or switch File to URL, paste an image's address and click Add.
To save a picture with no words, such as a photo of a handwritten card, turn on Image only? at the top of the dialog. The text box is hidden, and at least one image is required.
Say who it's from
- Name: the customer's name. It's required.
- Upload your user's photo: click Choose to upload a picture, or switch to URL to add one from a link.
- Job Title (optional) and Company (optional).
- Date: the date shown with the testimonial. It starts as today, so change it if the customer wrote to you earlier.
- Custom Fields, when your project has any and your plan includes them (Pro, Premium and Business). A field marked with * must be filled in.
Save it
Click Create. To add several in a row, click Create & Add Another instead: it saves the testimonial and empties the dialog for the next one.
You see "Testimonial added to Pending.", and the testimonial is saved in Pending, with a Manual badge on its card. That's true even when you add it from Approved. The list there doesn't change, so click Open Pending in the message, or open Pending in the sidebar, to find it.
If it isn't saved
A message tells you why:
- "Author name is required": fill in Name.
- "Testimonial content must be at least 10 characters": write more, or turn on Image only? and attach an image.
- A message that starts "Your plan allows": your workspace has reached its plan's limit. On Free, a workspace can hold 10 written, audio and linked media testimonials across all its projects. Pending and approved testimonials count. Rejected, archived and spam ones don't, so archive some you don't use, or upgrade. See Plan limits.
Other ways to add one yourself
The Add Testimonial group has three more options. A video or a screenshot you add this way is saved in Pending too.
- Add a video: upload a video file a customer sent you (WebM, MP4 or MOV), with a rating, the customer's name and your custom fields. The file has to fit your plan's video limits. See Collect video testimonials.
- Extract from screenshot: upload or paste a screenshot of a testimonial (JPEG, PNG or WebP). Its text, author, rating and date are read from the image, and you check and correct them before you click Create. This doesn't use AI credits.
- Bulk import: opens the Import page, for many testimonials at once. Only the workspace owner and Admins see it. See Import testimonials from CSV, Excel or JSON.
What happens next
- Approve it to show it. Widgets and Wall of Love pages show only approved testimonials, so click Approve on its card in Pending. See Approve, reject and archive testimonials.
- Add more details with Edit. A headline, a company logo, a company link, social profiles and a read more link aren't in this dialog. Click Show more on the card, then Edit. See Edit a testimonial.
- Let customers send the next one themselves. A form collects testimonials without any retyping. See Build a collection form.
Was this page helpful?
Review and export imported content
See everything you've imported in one list, filter it by source, approve or archive items in bulk and download them as a CSV file.
Approve, reject and archive testimonials
Review new testimonials in your inbox, approve the ones you want to show, and archive, restore or delete the rest.